Showing posts with label bridal. Show all posts

Monday, September 23, 2013

Brittany's Wedding Dress Roundup

(For more reading, see Meghan's dress update experience, our first and second installments of wedding saga, and what we wore to each others' weddings.) 

My husband and I have been together since we were 19, eight years, so the "when are you getting married?" question was not new to us.  I knew we would be together forever and at some point there would be a wedding, but for some reason I was very superstitious about planning our wedding before we were actually engaged.  The only things I knew before the moment he popped the question were that I wanted to get married outside, and I would be wearing my mother's dress.  

My parents have been married for 38 amazing years, and I only hope my marriage will form into as strong and loving a partnership as my parents have.  I'm a sucker for tradition and symbolism, and I could think of no better way to begin the next phase of my life than wearing the dress my mom wore to begin hers. 

However, 1975 and 2013 are very different, and as a costume designer I couldn't help but want to put my personal touch on the dress.  There were also several key physical differences between my mom when she wore the dress and me.  My mom was 18 and 5'6" (not including the platforms she wore), with the narrow frame of a 70s era high schooler.  I am 27 and 5'3" (and I wear flats), with the curvier frame of a 21st century woman.
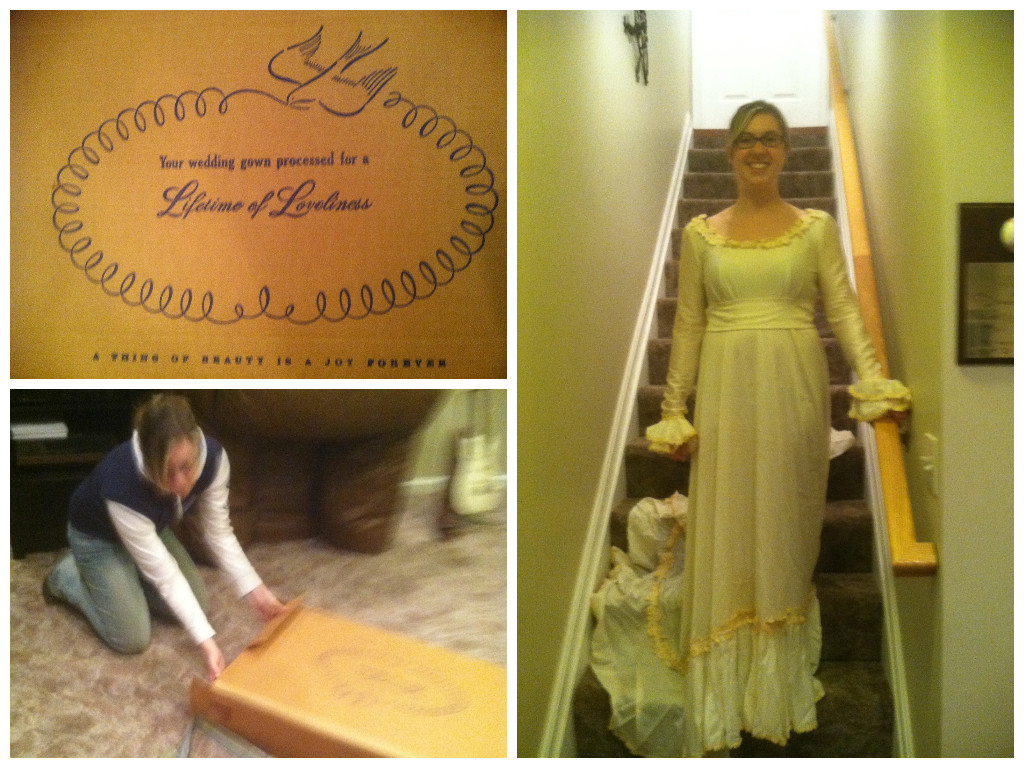
Getting the dress out of the box for the first time
I brought the dress into the Studio before I got it cleaned and we discussed some preliminary ideas.  The sleeves definitely had to go, and we had to figure out a solution to my height problem.  My dad and I both loved the cuffs of the sleeves, so I wanted to incorporate them somehow. 
Sleeve option: 1 of 100,000

Marilyn's appraisal


I have mentioned in the past that I missed my true calling as a Romantic era painting, and we knew the empire waist and scoop neck of this dress would be flattering.  To go with that theme, we thought a ruffled cap sleeve would bring the look together.


Trying to figure out bustling
Then 6 weeks of diligent dry cleaning (by the best in the world, TRS Cleaners), my dress was white again!  I showed it off during our Moms in the Studio visit.

What you can't see: gaping open back and 5" heels
 Then it was time to finally bite the bullet and actually take apart the dress.  Multiple panic attacks later, the dress lay in 5 still recognizable pieces: the bodice, skirt, sash, and two sleeves. 

Ready to walk down the aisle!
It was ultimately decided that, regardless of how "trendy" (ie. not classic) it may be, I really wanted a high-low style skirt and no one could stop me.  It reflected the bohemian look I now wanted (shown in our earlier blog), solved the problem of the dress being several inches too long in the front, and quelled my fears of dying of heat stroke in the hot June in Southern Maryland sun.

Note Meghan in her reception dress in the background!

And then I got way too excited and literally safety pinned it to my body
Then the dress was ready to put back together.  Though I approached the very first cuts of the dress as if I were to diffuse a bomb, the dress didn't explode and I had no regrets about my decision to shorten it.
excited!
Once the dress was back in one piece, I began the long, long process of changing my mind every other day regarding the length of the dress, the gathering in the front, the sleeves, pretty much everything.  As it turns out, I am the worst client ever.

When I cut the skirt down to make it high-low, the waistline became much too big around to have the smooth effect of my mother's dress.  My first instinct was to gather it evenly all the way around.

Not quite perfect, but ok for now
The exact height of the high low was agonizing to figure out. I am somewhat short and curvy (see: Romantic period) and I didn't want something that would make me look even shorter and/or curvier, but I also didn't want to show off a ton of leg on my wedding day.
A matter of an inch makes a huge difference

Calling in the expert

The sleeves were a constant struggle. I had become obsessed with the idea of a dropped sleeve, but I seemed to be the only person who thought it was a good idea. This was a lesson in making the client happy, because even though I couldn't get anyone to agree with me in the beginning, I was ultimately happier because it was what I wanted. 

With? Without? Higher? Lower?

Then the subject of my skirt came up again.  It was decided that the gathering was too much, so I decided to do a few large pleats on either side in the back. It smoothed out the front, and added a really beautiful line to the back.  


New front
Then it was finally time to actually close the dress. The original dress had a zipper, and even though those old fashioned zippers hold up awesomely, the sizing wasn't right on me and I wanted a more "classic" look in the back to go with the pleating.  It is possible to make your own corset lacing, but it is extremely time consuming and difficult to make evenly, so I went to the bridal shop down the block and bought a corset kit.  Installing a corset back is very similar to installing a zipper, which is to say difficult and time consuming.  But so worth it.


And then I was done!!!


Just kidding. I changed my mind about sixteen more times after that.  See in the above picture how the lace is all curled?  

Some background: throughout this whole process of updating our wedding gowns together, Meghan and I would periodically hold up our half-finished dresses and say, "I really REALLY don't want to do this, but would it look better if I did?" And the other would almost always have to say, "Yes, I'm sorry, I am so sorry, but it would look better if you did that thing that is going to take five to ten hours of hand stitching/seam ripping/taking apart and putting back together."  It was the exact gentle encouragement each of us needed to not let our stitcher selves convince our bride selves that we really didn't need to do the extra work.  It is so much easier when the client is someone else!

So I slowly, sadly, held up my dress and asked Meghan, "Do I need to stabilize all this lace?"  And she said, "Yes, I'm sorry, I am so sorry, but it would look better."  So I stitched down all the lace on the collar by hand, and then I stitched down the ten feet of lace on the skirt. But it really did "finish" the look.


The sleeves were still bothering me, and a friend advised me to thin out the straps to show off the lace and give the top a more delicate look.


Then there was the issue of bustling.  My train was fairly long so I needed multiple bustles to get the dress up off of the ground for the running around in the grass and dancing part of the night.  I ultimately decided to attach five ribbons at different points in the back, that would tie to five ribbons at the same bustle point at the base of my corset.  I stabilized it three or four times to keep the weight of the skirt from ripping the top during the reception.  The style of bustling I chose is called a French bustle, or an under bustle, in which the folds of the dress are visible.

1st: the back unbustled
2nd: trying out a French style bustle (though not the one I went with)
3rd: trying out an American style, or over bustle
(Full disclosure: the following picture is of one of my amazing readers 
and best friends holding my dress as I bustle it at my parents' house 
about an hour before the ceremony rehearsal.)


After taking apart and readjusting the front of the skirt one more time to mirror the pleats in the back ("Should I?" "I'm sorry, I'm so sorry..."), I was back to thinking about sleeves.  I had a brilliant late night brainstorm and decided to widen the neck to a boat style neckline, and add the drop sleeve with only about an inch between the neck lace and the top of the cuff. 


After a veil/fascinator/nothing back-and-forth that reflected my dress process, I finally just bit the bullet, walked into the bridal shop nearest my house, and had a total "Say Yes to the Dress" moment. 

Finally, finally, finally. My dress was ACTUALLY done! 

Totally cried when I saw myself in the mirror.

The sleeves, the lace, the skirt, the shoes, the veil, everything was perfect. 

Special thanks to Meghan, Marilyn, and my mom for their amazing guidance and patience, and to our AMAZING wedding photographer, Britt Croft of Britt Croft Photography, who was so great to work with and captured our day and my dress perfectly.


Friday, April 19, 2013

How to Spot Quality: Formal Attire Edition


It's getting warmer and greener outside, and people are coming out of their winter doldrums, which means formal events are soon to follow. Oh yes folks, wedding/prom season is upon us once again. So here we are again with the latest installment of How to Spot Quality: The Bride/Prom Queen Edition. (And check out our previous posts, Part I: Fiber Content and Part II: Shopping Online/Taking Measurements.)

One of the most common phrases we hear in the studio is "these alterations are costing almost as much as the dress!" Well if you got your dress for a bargain, there is often a reason... and many times that reason is what stands between you and a custom fitted garment. In order for clothing to be made cheaply, it must be made quickly, and on a massive scale.

This is not to say you need to spend a grand on a perfectly made-for-you dress every time you need to attend a formal event. There are, however, many immediate indicators for how expensive your alterations will be, and you can decide from there whether you really want the dress. Think of it as an emotional as well as a monetary investment, not unlike purchasing a new car. You want to check out all the features and quirks of the vehicle before you buy; you wouldn't just walk off the lot with the first flashy red sports car you see just because you look really good next it. You would want to know things like the MPG, how expensive the tires are to replace, and whether any parts are currently on recall, so you don't find yourself at the mechanic in two months giving over your vacation money to fix all those little unseen problems.

This same logic can be put toward a dress, and there are a few key things to keep in mind when considering your purchase (or your bridesmaids' purchase.)

CHIFFON
We all love the drape and flow of chiffon, but let me tell you it is a pain to hem, and it can quickly get expensive. The most prominent issue with chiffon is when it does something called "dripping" after it has been hemmed. This often occurs overnight or in the hours between hemming and pickup, in cases when several inches have been trimmed off. With the weight of those trimmed inches off, the fabric can bounce back up or sag down in a different way than it was when the hem was marked, making an uneven hem. And then when the hem has been evened out after it has dripped, dripping can even occur again if the garment has not had enough time to hang undisturbed and properly get used to gravity at its new weight.

This is common because almost all floor length dresses made in a factory are purposely made several inches longer than even the tallest person would need, partially to ensure the dress will be floor length for anyone, but mostly because it is a lot faster and easier to indiscriminately cut hems without having to worry about whether they are straight or even. Which brings us to...

HEMS
How many hems are in your dress? Unless you are looking at an unlined sheath dress, you have at least two hems. If you have a chiffon overlay, tulle between your shell and lining, and/or multiple layers on your shell, those are all separate hems. If your dress hem is more than 75" around, that usually costs a little more. Chiffon hems can cost a little more as well, due to the issues described above. Just because it is one dress does not mean your seamstress is only taking it up once. Count your hems, and multiply your estimate by that many. And the opposite of hems are...

SEAMS
Do all your seams line up? Seriously, take a close look, because it is quite possible that they don't. Another common victim of factory-made garments are seams, especially at the points where several seams meet. If you have a patterned dress the likelihood that the seams will not match up increases tenfold. There is also a keen possibility that the side seams and/or waist seam are not even or in the same place on either side. If your seams do not match up in a way that flatters your body (and everyone is different; know what works on you and makes you feel beautiful) my recommendation is that you RUN AWAY. If the pattern doesn't match and it bothers you, there is nothing that will salvage that dress after you notice it. Run away!! You could almost get a custom garment with the amount of taking apart and remeasuring and putting back together differently that is required to fix an uneven seam on a formal garment, because it usually has so many...

LAYERS
How many layers are in your dress? your shell is one layer, but then you may have an overlay, and lining, maybe some interfacing, and likely some boning in the bodice. All of that has to be taken in evenly, and if there is boning that has to be removed and then stitched back in. Modern bodices have a good deal of structure to give the silhouette we all think of when we think "bridal" or "prom," and in order to have structure you need several layers to create the stiff skeleton and then put the softer decoration on top. And if that decoration includes...

JEWELS/BEADING
Now we're really cooking. I love sparkles as much as the next person, maybe even more. But if you find yourself falling in love with a beaded bodice, do absolutely everything in your power to ensure that you purchase one that fits. Taking in a jeweled or beaded bodice requires hand-stabilizing each bead along the new seam line, individually crushing the beads inside the new seam allowance, and often (though not always) taking in the entire seam by hand. Hand stitching is a specific and extremely time consuming (not to mention more physically demanding) art, so the more hand stitching is required, the higher the alteration price. Speaking of taking bodices in...

ZIPPER
Where is your zipper? Is it on the side or the back? If it is on the side and the bodice needs taking in, save yourself some grief and move on. It is impossible to take in a bodice with a side seam zipper without removing and repositioning the zipper, much to your wallet's chagrin.

Alright ladies (and gentlemen) when you are out shopping for a formal dress and you are looking for the perfect fit with the perfect price tag, please take this advice to heart. While it may be easy to buy a gorgeous dress off of the clearance rack, it is not always so easy (or cheap) to alter. If it's the dress of your dreams, we are happy to alter it for you, but if you don't want to be the next victim of "my-dress-cost-less-than-these-alterations!" syndrome, be prepared to pick up your garment and investigate it! Remember: chiffon, seams, hem, layers, jewels, and zippers! Good luck!!

Thursday, August 9, 2012

How to Spot Quality Part 1: Fiber Content


This summer's Olympics began with quite a controversy over our athletes' uniforms, and it has opened up discussions all over the country regarding imported clothing.  We at the studio all agree that it's not the imported-ness that was so upsetting; it was the fact that our athletes just looked sloppy!  None of the garments seemed to fit properly, which gave our athletes a much "cheaper" look, one that more than once was described as looking like flight attendants.  Yes, there were 529 of them, but a little custom fit and care would have gone a long way for a televised event the entire world was tuning in to see!

We have noticed a recent uptick in imported bridal garments as well, in which the manufacturing quality is shockingly low.  There are several very important things to know when buying garments, especially for special events.  We have found that many people who come through our shop were unaware of these key topics because, of course, most of us don't deal with custom-made garments on a daily basis!  In an effort to help stem the tide of poorly made garments in this world, we will be authoring a series of posts over the next several weeks on how to spot (and avoid!) poorly made garments, and which questions to ask before you buy.  We hope that this little bit of advice from people who see it all the time will give average women the tools necessary to pick out the best possible garment for their budget.

We will be discussing fit and construction (the biggest, most noticeable difference between beautiful and sloppy garments) in this series, but first a quick lesson in fibers!

Always, always, always (did we mention always?) look at the fiber content before you buy.  By law there there has to be a label in every garment listing the country of manufacture or origin, fiber content, and care instructions.  If the garment doesn't have those labels it could be illegally imported!

If at all possible, avoid acetate fabrics for bridal or other special event garments or in situations in which you may be sweating (altho in the South, women "glow").  Acetate does not breathe, it doesn't wick moisture from your body and it can water stain.  In a wedding with an outdoor ceremony, the extra sweat it causes to trickle down your back may literally leave water rings.  It is not used much in blending with other fibers, depending on the other fiber, so the fabric is usually 100% acetate or none at all.  A garment made of acetate cannot be let out because the stitch marks, and by proxy any holes, are often permanent.  But if your dream garment happens to have a very low percentage of acetate, you will probably not see the issues we just described.

The manufacture of synthetic fabrics has improved a lot over the years; some synthetics are so good they can fool even an experienced eye.  This can be a really good thing if you want or need a high-end garment on a budget, but it is always important to know exactly what you are buying.  We recently had a client ask us to make some hair wrap ribbons for her from fabric she had purchased at a well-know chain fabric store.  She believed it to be the 100% silk she needed, but a burn test proved it to be 100% saran, a synthetic fiber.  When I showed her a swatch of real silk to compare to her fabric she could literally feel the difference.  (Real silk has a "crunch" to it)

There is absolutely nothing wrong with synthetic fibers, and buying a garment that is partially or 100% synthetic can be a good way to get the look of a much more expensive garment for an affordable price.  But there are a few things to be aware of when it comes to synthetics: synthetic fibers do not breathe, meaning they do not allow air to flow freely through the fabric, and they do not wick, which is when the fabric absorbs and helps moisture evaporate off your body so you are less likely to sweat profusely while wearing it.  Some examples of natural fibers are cotton, wool, and silk. Some examples of synthetics are polyester, rayon, and acetate.

As we mentioned before, there is nothing wrong with synthetic fabrics, but we have often seen women come in our shop thinking their dress or other garment has a fiber content that it simply does not have.   We believe information is power, and if women know exactly what to look for when buying, they are most likely to get exactly what they wanted in the end.   Remember! look for the Fiber Content label!

Tune in next week for our next installment of How to Spot Quality!

Friday, February 10, 2012

Flashback Friday : The Bride Guide

Hello all! This week's Flashback Friday is an excerpt from an article Marilyn wrote in 2009 for The Prince George's County Women's Journal. This was one of three stories about different brides who have walked through our doors and the unique challenges and ideas they brought with them.

"One of the most challenging wedding gowns I worked on was actually custom designed by Judith Brooks of Anjoorian Silks for a DC bride. Judith suggested that the bride get in touch with my to fit the muslin and actually construct the gown.  After fitting the muslin, Judith arranged for the bodice of the gown to be hand-beaded in India based on her interpretation of a crochet pattern selected by the bride.

wedding12a
Here is Molly trying on the fabric before it was a dress.

"Several weeks later I received the beaded georgette, silk charmeuse and pattern. In order to sew the lining, close the darts, and create the scalloped hem, the entire bodice had to be sewn by hand so the beads weren't disturbed and went 'to the edge.' Fortunately, the skirt for the ensemble was not beaded and could be sewn using my machine!  The final results were well worth the effort of all the hand stitching and the bride had just the look she wanted in a truly unique ensemble."

wedding12
Our bride sees herself in the finished ensemble

Monday, November 22, 2010

Fashion ER

Just got 2 calls for sewing ER services.

The first is a bride getting married on Friday. Her corset needs a last-minute alteration by Wednesday! My friends at Bra-La-La sent her here since I’ve done this type of alteration before. So glad to be able to relieve some stress for a bride.

The other call is for an Indian costume for Peter Pan. I'm letting my imagination go wild on this one! The Laurel Mill Playhouse is mounting this show and it opens next week!

Even under pressure, I love creating things and making other people's lives easier.