Thursday, January 17, 2013

Sewing and Organizing Tips: Tuesday Tip Roundup I

Every Tuesday on some of our other social media outlets, we publish a tip from Marilyn on how to keep your sewing area organized and efficient, from DIY substitutions to why-didn't-I-think-of-that organizational advice. Below is a roundup of our first ten Tuesday Tips:


1.  Sort and store your fabrics, threads, and notions by color.

fabrics in totes organized by color

2.  Make your own pattern weights using two 5/8" zinc cut washers hot glued together on the flat sides - costs about 30 cents each

pattern weights made from washers

 3.  Extend the life of your pattern tissues by keeping them in 9 x 12 manila envelopes. Cut the pattern envelope and glue it to the manila envelope; the tissue doesn't have to be folded so tightly and the patterns go in and out easier.

a drawer of custom patterns in manila envelopes

 4.  Freezer paper is useful as a substitute for pattern paper: sturdier and cheaper. I use the kind that is waxed on one side. Wax paper is also useful as a tear-away stabilizer: If you're sewing a fabric that doesn't want to flow under your pressure foot, back the fabric with it and tear away when done stitching.

freezer paper in the bin

5.  Don't forget to press your pattern pieces before laying them out on your fabric - set your iron on synthetic and no steam.

wrinkly pattern pieces and iron on no steam synthetic

6.  Keep pin cushions at both your sewing machine and your work table - saves jumping up and down for pins.
multiple pin cushions

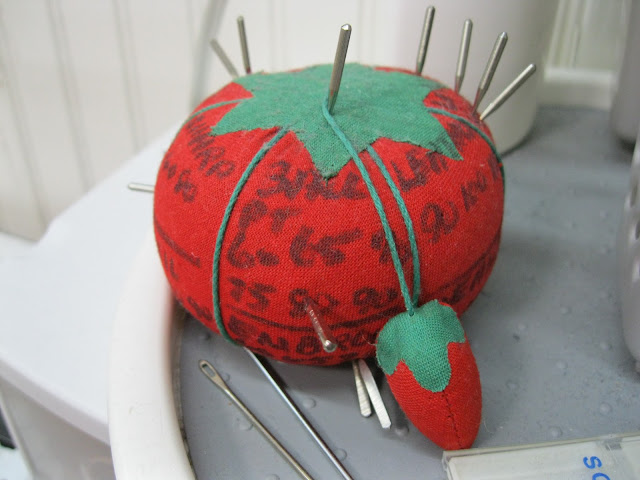
 7.  Use a tomato pin cushion to store slightly used machine needles - use a marker to divide it into sections for each type (Universal, 60, 70, etc.)

tomato labeled with machine needle numbers

 8.  Don't sew over pins - it can nick both the pin and the needle and cause burrs that then can cause pulls and runs in your fabric

taking pins out while sewing

9.  A good substitute for a velvet board is a thick terry cloth towel.

terry cloth over velvet

 10.  You can make your own seam stick by going to the hardware store and getting an 18" piece of 1/2" half round moulding

half inch round moulding


We hope these have been helpful! We will do another round up in a few months, but in the meantime, you'll see our updates in real time every Tuesday on Facebook, LinkedIn, and Google+.

Sunday, November 25, 2012

White House Historical Association War of 1812 Recap


 The past few months here in the studio have been chock full of the Forgotten War. As we've mentioned previously, we were updating costumes for two currently running programs with the White House Historical Association: First Kids, about kids who have lived in the White House over the course of our country's history, and Paths to Freedom, about the Civil War (check out the video on their website to see a sampling of the costumes we made for them!)

panorama of the studio
Welcome to the chaos!
The third program was to be completely new, about the War of 1812.  We made costumes for an entire cast of characters: President James and First Lady Dolley Madison, Dolley's house servant Sukey, the 15 year old slave Paul Jennings who helped save the famous painting of George Washington, and the French Ambassador Louis Serurier, among many many others that we will detail in an upcoming post.

The List
In the beginning... there was fabric


For this post we will simply detail the PROCESS.  And process it was.  From design and conception to patterning to full-scale factory-style assembly line, we were in full tilt for the entirety of the project.  The complexity of the costumes, particularly of the men's uniform jackets, was daunting.  Men's coats in 1812, especially those of the military and upper class, had all the trimmings: cuffs, tails, standing collars, layers of interfacing, and buttons galore.   


1812 jacket and collar1812 cuff


We were all hands on deck so Caroline (who you may remember from this post about LADEC) and Barb, two lovely ladies we have worked with in the past, came back to join the fun and frenzy.  We were also joined by our new regular addition, Sara (who you may remember from our recent Halloween post.)  And as always, Marilyn, Meghan and I were there in the thick of it.

Caroline and the impressive pile o' trims
Barb, about to start buttoning

Sara and Meghan sewing and serging

Me carefully labeling and cutting jackets so as not to lose them in the flurry of blue peachskin faille
Sara, Marilyn, Meghan, and Caroline were positioned perfectly long enough
for me to snap one picture, and then it was back to the 1812 flurry!

All the costumes were made from a hue of peachskin faille, an extremely sturdy polyester blend that has the look of a more expensive fabric, hangs well, doesn't fade with wash or wear, and is virtually un-wrinkleable.  In other words, perfect for costumes that literally thousands of kids will be pulling on and off over their clothes over the course of the next several years.  With our 1812 order we also had some minor repairs to do on some of the Civil War and First Kids jackets from several years ago, and even we were impressed at how well the costumes had stood the test of time: the fabric on a brand new jacket and a six year old jacket needing button repairs were virtually identical.  


All machines on deck!
An overflowing bucket o' ladies-to-be
When we first began this project, we knew we were going to need a little extra something to unite us in focus and drive, and to help any extra-long days feel not so extra-long.  Enter: Harry Potter.  We listened to the entire seven book series while we cut, serged, stitched, and pressed.  117 hours and 4 minutes of Jim Dale interpreting J.K. Rowling. It was by far our best decision, and to be quite honest we feel a little lost without them now (is it too soon to start all over??)

Oh Harry Potter. We laughed with you, we cried with you.
Mainly cried though, because holy moly what a sad series.

And then, suddenly, we were done.  We stood back for only a moment to admire our handiwork before moving into the next project, but that moment felt GOOD.

All the laydees
The finished rack! The costumes wrapped all the way around.
Meghan gets pictures of her cravat handiwork. Note Marilyn in the loft holding them all up.
And then it was time for the costumes to go to their new home in DC, but not before one last photo op!  Note the two newest members of the nonmoving branch of our studio family, Trevor and Susie Q.  They fit in very nicely with Molly and our other two dress forms, don't you think?

Photo credit: White House Historical Association @WhiteHouseHstry
Last, but most certainly not least, thank you so much to John, Courtney, Katie, and the ladies and gents of the White House Historical Association for the opportunity to work with you again.  This project was exciting and colorful and stretched us creatively and mentally in so many wonderful ways we never expected.  We learned some history, drafted some patterns, and invented whole new ways of interpreting historical research to fit the unique needs of this program.  We got to do what we love and we are so happy with the result, and even happier that you love it too.

Wednesday, October 31, 2012

The Ghosts of Costumes Past

Hello again! So sorry for the radio silence; we've been neck deep in 1812 for the past few weeks, but we're back now, and better than ever!  We also have so many updates to fill you in on, but an important holiday must first be recognized.

IT'S HALLOWEEN, Y'ALL!

We thought we would celebrate by reminiscing on some of our first and favorite costumes from our pasts, in order of years...


 In 1988 I wasn't finding and pulling my own Halloween costumes yet, but this pictures shows I clearly got my quirky sense of costume humor from my parents.  My dad, who had a sprained arm at the time, went as a one-armed jack, and my mom, who was extremely pregnant with my brother at the time, went as a bowling ball.


In 1998 Meghan's mom made her and her and brother into the cutest little candies on the block. And then ten years later, the exact costumes were worn my Meghan's mother herself and a friend. Impressive!

1998
2008
In 2007 Sara costume designed her first show, Ragtime, in which she was also an actor. She never seemed to have the time to make costumes for *herself,* but here are her first costumes she made for others!

Sara with her towheaded show family
In 2012, Marilyn made costumes for her granddaughter's Batman themed birthday party, in which her granddaughter was Batgirl and her baby brother was The Boy Wonder.

Na-na-na-na Na-na-na-na Batgirl!

Marilyn and The Boy Wonder

What were your favorite costumes?  Do you make, rent or buy your Halloween costume from year to year?

Friday, October 12, 2012

Flashback Friday: World War II Navy Nurse Re-Enactor


This Flashback Friday comes from an article Marilyn wrote for The Bride Guide in the Prince George's County Women's Journal in 2009:

Reference: Couture Allure Vintage Fashion Blog

The next project to deliver this summer was a World War II Navy Nurse uniform for a re-enactor. Working from period photos, my assistant developed a pattern that was an exact replica complete with the very extended lapel and notching.


My client ordered fabric from the very company that made those uniforms (yes, they're still in business! and still making uniforms from what I understand).  Lots of detail work went into re-creating this uniform and the results were spectacular! At the final fitting my client arrived in jeans and t-shirt.  She went into the dressing room to change into her new uniform and stepped out transformed. It was like a momentary time warp. Needless to say, we were both very happy with the uniform!


Thursday, October 4, 2012

NPR Also Says to Check That Tag

Here in the studio, we love us some NPR.   With the exception of the past week or two, when we've been listening to the complete Harry Potter audiobook series to get us through all the patterning we're doing (just started Book 5!) , we listen to hours upon hours of Diane Rehm, Kojo Nnamdi, Ira Flatow, and all those kooky economists at Marketplace.

So I was pretty excited when I stumbled across this gem from Caitlin Kenney at Planet Money.  Here she investigates why her wedding dress cost the amount it did, and she ultimately decides that she was, in her words, "ripped off."  What I think is most important to take away from this, however, is not as she says to shop around and look for cheaper options.  It is to better understand what to look for to find a quality garment for this incredibly special occasion, or to know what you're buying and why.


In Ms. Kenney's case, she ended up buying a dress that had been mass produced with inexpensive fabrics, and while she was never lied to, she also did not know to ask any of the right questions that could have helped her understand what she was getting into.  Some of these questions we have started to outline in our How to Spot Quality series (see Part I and Part II).  Both industry experts she interviewed assumed her dress had a lower price tag.  But as Ms. Kenney says of her dress shopping experience, "In that kind of atmosphere it never occurs to you to say 'What's this made of? This isn't polyester, is it?"  New wedding dresses are expensive, for the most part for good reason, but they are also an investment.  And like when buying a car, you deserve to know what is going into the product in which you are investing.

Now this is not to say that there is anything wrong with polyester.  Polyester can be fairly convincingly rendered to look and move similarly to more expensive fabrics, for a much lower price.  However, it is imperative to know that that is what you are buying, and not fall into any assumptions about where your dress came from and what it is worth.   In the coming weeks, we will be posting some more from our How to Spot Quality series, so look forward to some more insights and advice from our end, but we would love to hear your stories and learning experiences in the comments as well!


Friday, September 28, 2012

Flashback Friday: Saving an Unsalvagable Dress


Today's Flashback Friday comes from another article Marilyn wrote for the Prince George's County Women's Journal:

I worked with a bride who very much wanted to wear her mother's 1950 wedding gown on her wedding day.  Since her mother had passed away, it was a way to bring her mother's presence into the wedding.  The gown had been stored for years and so it was sent to a local dry cleaners who damaged the gown in the process of cleaning and pressing.  The bride's sister worked through a list of local dressmakers but none were interested in working on the gown when the damage was explained.  Finally, she got my name on her list and I agreed to assess the damage and suggest what could be done.


The damaged dress

Note the stains; they were everywhere!

After a burn test to determine fiber content and a close examination of the damage I felt that the gown could be returned to its glory.  We developed a multi-step plan that included cutting out the original lining and horsehair, replacing the original lining and horsehair, replacing the original trim along the neckline, some minor alterations and sending it to my preferred dry cleaner [Editor's Note: It's TRS Dry Cleaners, and we recommend these life-savers to anyone who comes through our doors!] for stain removal and pressing.  I was also asked to remake the headpiece and veil with as much of the original parts as possible, replace missing covered buttons, and, using some of the new neckline trim, add accents to the wristlets, purse and shoes the bride was adding to the ensemble.


When it was all done, the gown looked fabulous, the bride was happy, looked beautiful, and I was able to take quiet pride in contributing to her dream of wearing her mother's wedding gown.


Thursday, September 20, 2012

Moms in the Studio

A few Saturdays ago, Meghan's and my moms came up to the studio for an afternoon of tea and wedding talk.  I made cucumber sandwiches, Meghan made lemon cookies, and Marilyn created a teascape worthy of the queen.  This was the first time either of our moms would be touring the studio and meeting Marilyn, so we were really excited to show off our work... and our dresses!

Both Meghan and I are going to update our mothers' dresses for our own weddings, but we will not be doing any major updates until after our current studio projects are finished.  We wanted our moms to see us in their dresses, cleaned and in their full glory before we changed them in any way.  We had a blast trying on our mothers' gowns and talking in depth about what we were going to do with them to update the dresses for our own weddings. And of course we took pictures.

***ATTENTION: SPOILER ALERT! If you are the fiance of either Meghan or myself, you should not go any farther in this post. I'm looking at you, Nick and Steve!!***

Now, then.

My parents got married on August 2, 1975, and Meghan's parents wed exactly 11 years later (to the day!)   Both gowns are long sleeved, and with ruffles and long, wide trains.  However, the differences in style and cut between 1975 and 1986 are immediately clear.  Meghan's dress has intricate beading and lace with a chiffon overlay to give it a "dreamy" effect; very Princess Di!  The lace on my mom's dress is of the large 70s style flowers seen so often in flashback reels, and the belled sleeves and empire waist popular of the time.  Both dresses have a flowy vintage feel that is very different from the structured bodices that are so popular right now.  We will be documenting our progress as we merge old and new to create something perfectly suited to our personal styles, without losing the deeply personal effect of wearing our mothers' dresses.

With the dresses on, we talked about our initial ideas for each update, which you can see a bit of on our Pinterest pages for Meghan and me.  We will discuss more details as we go, and share our updates here.

And without further ado, The Gowns!

Meghan; note the high collar, sweetheart neckline, and basque waist. 

The train

Meghan and her mom

Me: note the wide neck, belled sleeves, and empire waist.  

The train

Me and my mom (don't be fooled, I'm wearing obscenely high heels)

Wednesday, September 12, 2012

Sponsoring Looks for Life


This year we are official sponsors of LOOKS Salon and Spa's annual Looks for Life fundraiser for the local non-profit Grassroots for Suicide Prevention.  The fundraiser was started by the salon's owner, Marilyn Petersen, after her son Patrick committed suicide in 2002, and has raised over $100,000 for Grassroots over ten years.  Grassroots provides an emergency and transitional shelter, a 24-hour phone and walk-in crisis center and an educational resource for all.  Suicide is a painful and personal topic for many of us, and what Marilyn Petersen has achieved in the face of such a tragedy is praiseworthy.

From Sept. 9-23rd you will be able to see materials relating to the studio set up at Looks, and on Sunday, Sept. 23 from 10am to 2pm Looks Salon will host its fundraiser.  The staff will offer traditional salon and spa services at discounted prices: $40 haircut and styles (one-price-fits-all women's, men's, and children's cuts), $25 blow-drys, $15 manicures, $12 eyebrow waxes, and $25 half-hour massages.  There will also be refreshments, a DJ, and a silent auction.  ALL proceeds from this event will be donated!!

If you can't attend on the 23rd or just want to help out even more, on Thursday, Sept. 20 from 7pm to 12am, Sonoma's Bar and Grill will host an event for this fundraiser, with a nominal cover charge donation, a DJ, bar specials, and 50/50 raffle tickets available.


We will be at both events; we hope you are able to join us in supporting this great cause!


Locations:

LOOKS Salon and Spa
6822 Oak Hall Lane
Columbia, MD 21045

Sonoma's Bar and Grille
7284 Cradlerock Way
Columbia, MD 21045